Images can be used to convey information, context, and emotion while increasing understanding and interest. But some of our students will not be able to see our images and some of our images may be sending the wrong message. Our responsibility is to provide an alt-tag or alternative text for each image that will provide information to students about the subject and purpose of the image. While this is enough to satisfy accessibility requirements, we have an opportunity to explore inclusion and representation through the images we choose and we can model academic integrity by providing attributions for our images.
Use these tips to choose and format your images for use in documents, emails, presentations, learning material in Blackboard and more.
Better Images Checklist
- Is your image sending the message you intend?
- Are your images the right display and file size for your media and download speed?
- Do you have the right or permission to use this image?
- Have you provided attribution?
- Do all your images have appropriate Alt-tags and longer descriptions where needed?

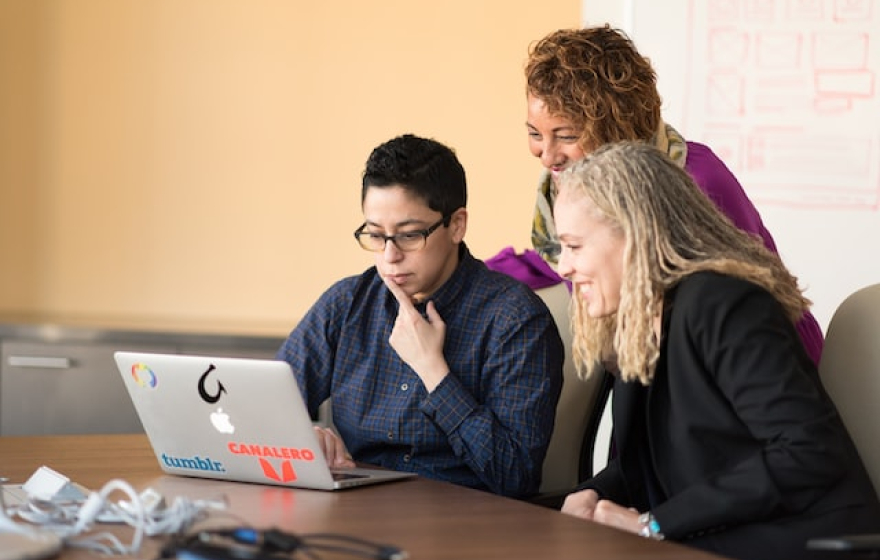
Photo by Christina @ wocintechchat.com on Unsplash
Before including an image, ask yourself the following questions:
- What is the purpose of the image?
- Who is in this image?
- What is happening in the image?
You may also find that these questions help you create more effective alt-tags and image descriptions for your selected images.
What is the purpose of the image?
Image purposes may include: functional images such as a printer icon to represent the print function; complex images that display data or graphs; images of text such as logos or slogans; decorative images that provide visual decoration without conveying information and informative images such as pictures, photos and illustrations (World Wide Web Consortium, 2015). Before selecting an image, decide what purpose the image will fulfil and what message you want the image to send.
Who is in this image?
When selecting images, it is essential to choose images that not only relate to your content, but to the students interacting with your material. Students who are able to visualize themselves in representative media are more likely to relate to scenarios presented to them and more effectively retain information. It is also an opportunity to breakdown stereotypes and promote anti-racism. Before you begin selecting new images, take a look back at images you have used. Compare your images to this checklist from Forum One (2021).
Do your images contain:
- People of different races/ethnicities: African/Black, Hispanic/Latinx, Asian, Middle Eastern, Caucasian/white, mixed-race, among others.
- People of different genders: Women, men, transgender, non-binary, and other genders.
- People of different ages: A range of ages from birth to old age.
- People of different abilities: People with a wide array of different physical and mental abilities or disabilities.
- People with different body types: A range of body types, sizes, and heights.
If not, you can choose now to make more diverse and inclusive choices. Making these representative image choices is part of our responsibility as educators.
What is happening in this image?
Images represent an immediate snapshot of situations and dialogues, such as communicating positions of authority. Be mindful of these considerations when choosing pictures for your content. Beyond the representation checklist above, also consider how different people in your image are depicted. Are there negative stereotypes that are re-enforced by your image.
Here are some other things to consider as you prepare and choose images:
- Figure out who the active agent is in your images — the person who is the one pictured as doing something.
- Determine who is shown in positions of authority and leadership. Is the portrayal accurate? Does it tell the whole story?
- Take a look at body language and positioning — what does this tell us about who has the power?
- If there are individuals in the image, why are they included? How are they shown to engage with each other, their environment, or with society?
A final question: Does your image need people?
If you are having trouble finding an image that depicts people in a positive light, one alternative is to consider using an image that does not include people at all. Instead, you could use an image of an object or setting that still relates to your message or content. One example of an image that could represent students without depicting people, could be a photo of a stack of books, a notebook and pen on a desk, or a chalkboard with equations written on it. These images can convey the idea of learning and studying without showing people. Another example could be an image of a computer or a tablet showing a document or a presentation, which can convey the idea of students working on a project or doing research. This can be a way to communicate the idea or concept without potentially perpetuating harmful stereotypes or biases.
Remember:
In order to support diversity and inclusion efforts through the selection of images for videos and presentations, it is important to be mindful of the representation, stereotypes, cultural sensitivity, authenticity, and potential harm of the images being used.
- Representation: you can ensure that all students see themselves represented in the materials. This can help to create a sense of belonging and inclusivity.
- Breaking stereotypes: images that challenge stereotypes can help to break down harmful biases and promote a more inclusive culture.
- Promoting understanding: Showcasing images of people from different cultures, abilities, and lifestyles can help to increase understanding and empathy among students.
- Reflecting reality: reflecting the diversity of the real world can help to create a more authentic and relatable presentation.
- Avoiding harm: you can help to avoid perpetuating harmful stereotypes or causing offense to any members of your audience.
Let's examine some images
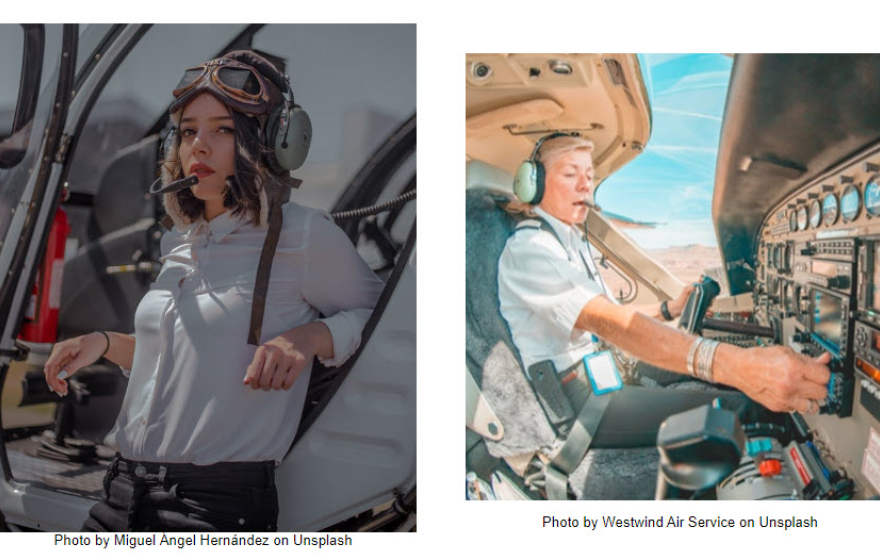
Let's examine two images of female pilots. Both are suitable choices depending on the intended use. The main figure is portrayed differently in each image.

Photo by Miguel Ángel Hernández on Unsplash Photo by Westwind Air Service on UnsplashHere is another image. This image is suitable for a specific purpose. The man in focus is the central figure. He is also positioned in the center of the photo and is making a gesture, indicating action. The other individuals in the photograph are out of focus and look passive. One person in the back has their arms crossed across their chest.. When evaluating this photograph, consider the central figure, their power and the actions of the other individuals in the photograph.

Photo by Parabol | The Agile Meeting Toolbox on Unsplash
Professors and Teachers
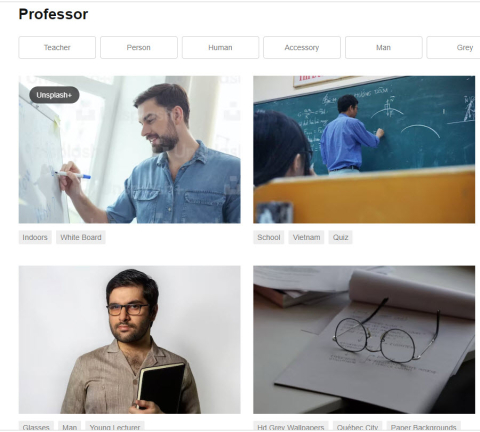
Finding a diverse range of photographs may require more effort. When searching for an image of a female professor, it was challenging to find an appropriate one. A search for "Professor" on Unsplash returned 20 photos, 14 of which featured a visible person. Of these, 11 were of men and 3 of women. The images of men often depicted them in active poses, such as writing on a board. The top results displayed 3 images of men and one of a set of glasses on a desk.

Screenshot from Unsplash
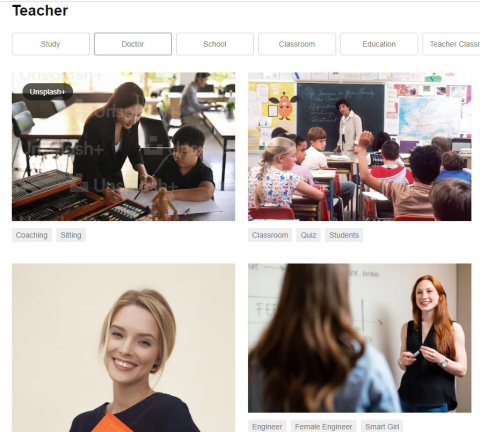
Similarly, a search for "Teacher" on Unsplash returned 18 photos. The top four images were all of women and three of them featured school-aged children. Of the 18 photos, 12 depicted women as teachers. Without considering the potential consequences, selecting the first or second image from these results could reinforce the stereotype that all college professors are men and all teachers of school-aged children are women.

Screenshot from Unsplash
References
- Forum One. (2021). How to choose diverse and inclusive photos. Retrieved from https://www.forumone.com/ideas/how-to-choose-diverse-and-inclusive-photos/ ↵
- Mennonite Mission Network. (2021). Shared voices. Retrieved from https://www.franconiaconference.org/media-uploads/pdf/SharedVoices10-239_Download.pdf ↵
Where to find Better Images
Giving Attribution
When you use an image with a Creative Commons license, you have to give credit or attribute it in a particular way. Attributing just means saying what the work is, who made it, where it is from, along with what license it is used under.
The acronym TASL can help us remember what to include.
- Title of the image
- Author or creator of the image
- Source of the image. Where is it from?
- The license of the image
In some cases, such as with Creative Common Zero licenses on image collections, there may be a suggested attribution statement that you can copy. Using creative commons and public domain images and providing appropriate attributions gives us an opportunity to model ethical behaviour (not stealing images from the internet) and giving credit to others for their work (academic integrity).
We have listed a variety of General Stock Photo and Specialty Stock Photo sites below to help you find quality Creative Commons and Public Domain images that you are free to use in your learning materials. If you choose to use a search engine such as Google to find images, most have a filter or search function to help you find openly licensed images. Google provides instructions on how to access filters under Tools and Advanced Search. Although many of these directories contain images that are licensed under Creative Commons Zero (CC0) and do not require an attribution statement, we recommend you do include one. It can be as simple as:
- Image by (name) on Unsplash
- Photo by (name) on Pixabay
General Stock Photo Directories
These images are CC0, CC BY or Public Domain
Unsplash provides creative commons or public domain licensed images that can be used for commercial or noncommercial purposes without permission or attributing the photographer or Unsplash. The photos can also be modified. Click on the image you want and click “Download free” in the top right-hand corner to save the file. Click on the arrow next to “Download free” to save the file in a different size.
Photos for Class provides creative commons or public domain licensed images appropriate for the classroom. The citation for the author and license is automatically added to the bottom of the image. Simply click on the image or the download link below the image to save the file.
Noun Project: Free Icons provides public domain, attribution licensed, or royalty-free licensed illustrated icons. Click on the icon you want, create an account or sign in, click “Download Icon”, and choose which download options you want. If attribution is required, the attribution will be automatically added to the file.
Noun Project: Royalty Free Images
Noun Project: Royalty-Free Images provides public domain or creative commons licensed photos. Click on the photo you want, click “Get This Photo”, and choose which download options you want. If attribution is required, the site generates attribution text that can be copied and included in an image caption, credits page, or other visible location.
Pexels provides free stock photos, royalty-free images, and videos available to use without attribution to the photographer or Pexels. The photos and videos can also be edited. Click on the photo or video and click “Free Download” to download a file. The website gives you the option to copy a link back to the file’s page on the Pexels website. Clicking the arrow next to “Free Download” allows you to customize the size of the file you download.
Pixabay is a collection of copyright-free images, videos, and music. All contents are released under the Pixabay License, which makes them safe to use without asking for permission or giving credit to the artist. To download a picture, click on the picture and scroll down to find the “Free Download” button. Select your preferred file size and then click “Download” to save the file.
CC Search searches for images from open APIs and the Common Crawl dataset. All content is under Creative Commons licenses or in the public domain. The search can be modified to include images that can be used commercially and/or modified. Click on the image you want and press the “Go to Image’s Website” button to start the process of downloading the image. The process will differ for each website.
Hand Drawn Illustration Library Open Peeps is an illustration library consisting of images that are free to use for commercial and personal use under the CCO License. It is easy to create and customize images by pressing the edit button above the selected image. Press “Download” and choose your file size to save the illustration of your choice.
Open Doodles is an illustration library consisting of images that are free to use for commercial and personal use under the CCO License. It is easy to create and customize images by pressing the edit button above the selected image. Press “Download” and choose your file size to save the illustration of your choice.
Reshot features icons, illustrations, and photos that are free to use for both commercial and non-commercial projects with no attribution required but recommended. Select “SVG Icons”, “Vector Illustrations”, or “Stock Photos” to begin your search. Type keywords into the search bar, and click on the image you want to save. Below the image, you will find the button to download the file to your computer.
Gratisography has a collection of quirky, free stock images. These images can be used and modified for both personal and commercial projects. Click on the image you want, and press the download button above the picture to save the file.
Specialized Stock Photo Collections
WOCinTech's Flickr Collection is a collection of photos that feature women of colour in tech. The images are licensed under Creative Commons BY 2.0, which means they can be used anywhere but require attribution. To download an image, click on it and click the downward arrow with a line underneath it at the bottom right of the image. Then select size and the image will start downloading. To give attribution, just reference the hashtag #WOCinTech and provide a link to the license. Example: #WOCinTech (CC BY 2.0)
Ukblacktech offers a collection of photos that feature people of colour in tech. To download, you can click on the download all button, which will download all the images. If you only want one image, right-click it if you are using a mouse or click with 2 fingers if you are using a touchpad. Then, from the menu that pops up, select the option that says, "Save as" or "Save Image As". Then save the file to the folder of your choice. To give attribution, you must give credit and provide a link to the license. Example: Image from UKBlackTech (CC BY 2.0)
Black Illustrations This icon illustration library features 120+ images of black people in countless careers. The icons are available as both PNG and SVG files so they’ll work on any device. An Adobe Illustrator file is also included if you want to edit them yourself. To download the collection, press the purple “DOWNLOAD” button.
Acknowledgment
This module wasmade possible with funding by the Government of Ontario and through eCampusOntario’s support of the Virtual Learning Strategy. To learn more about the Virtual Learning Strategy visit: https://vls.ecampusontario.ca.
Contributor:
- Irene Stewart, Retention Coordinator

This work is licensed Creative Commons Attribution Non-Commercial ShareAlike by St. Clair College, Centre for Academic Excellence and Quality Assurance unless otherwise noted.